Online DOOM! gaming...
..using miniatures. Now minis enthusiasts can imagine driving along a low stone wall, emptying a machinegun clip or two for suppression fire, switching out their empty MG for an anti-tank gun, then letting loose into their favourite enemy Vickers Light Tank Mk VI. All in one 'Movement' phase. (And that doesn't even count the somersaults performed by the truck's crewmen.)
For years I would wonder at those FASA BattleTech models whose owners spent way too many hours customizing their 'Mechs resulting in each model being able to accept a varied array of "modularized" weaponry through the use of tiny [but powerful] 'rare earth magnets'. The ingeniousness; the 'Neat-o'ness; the versatility.
Behold the World In Flames [Battline] AS.37 Autocarro Sahariano!
https://www.flamesofwar.com/online_store.aspx?CategoryID=10917
(Upper right)
This light truck model "contains a 1pc resin AS37 Sahariana with MG, AT Rifle, 47mm AT gun, and 20mm AA gun options." cool. When I first bought it, I was simply going to pick one weapon to glue onto the bed of the truck and submerge the excess unused items into my pool of WWII Italian spare parts bin. But no. Almost for the hell of it, for my first time I decided to make a go of pouring in a bit of effort to make this truck able to be 'weapon swappable'; "Go-Go Gadget Breda Anti-aircraft gun!" I do believe a series of sequential pix are in order.
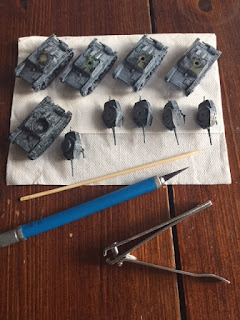
 Above, we have three loose artillerists, the resin truck, and the various main weapons. With the help of (1) a hand drill 11.5mm in diameter] and (2) earth magnets [also 1.5mm in diameter], we can go about drilling out the main weapon ring mount (to be affixed into the bed of the truck), and each of the 3 main weapons to have a small magnet inserted into their bases.
Stage 1: The ring mount and main weapons have been drilled out with a 1.5mm drill bit. A bit fiddly, but possible:
 Stage 2: With one earth magnet already inserted into the ring mount below, each of the main weapons will likewise have a magnet glued into the weapons' bases:
 Stage 3: The three artillery guys will be mounted on thin cardboard for bases. Three holes are drilled in a strip of cardboard for the right foot to be inserted into for each figure:
 Stage 3: The 3 artillerists are epoxied onto the cardboard:
 Stage 3: The truck's ring mount is glued into place. Note the machinegun & post lying alongside for illustrative purposes. This provides an idea for why the ring mount is mounted so far from the cab:


For years I would wonder at those FASA BattleTech models whose owners spent way too many hours customizing their 'Mechs resulting in each model being able to accept a varied array of "modularized" weaponry through the use of tiny [but powerful] 'rare earth magnets'. The ingeniousness; the 'Neat-o'ness; the versatility.
Behold the World In Flames [Battline] AS.37 Autocarro Sahariano!
https://www.flamesofwar.com/online_store.aspx?CategoryID=10917
(Upper right)
This light truck model "contains a 1pc resin AS37 Sahariana with MG, AT Rifle, 47mm AT gun, and 20mm AA gun options." cool. When I first bought it, I was simply going to pick one weapon to glue onto the bed of the truck and submerge the excess unused items into my pool of WWII Italian spare parts bin. But no. Almost for the hell of it, for my first time I decided to make a go of pouring in a bit of effort to make this truck able to be 'weapon swappable'; "Go-Go Gadget Breda Anti-aircraft gun!" I do believe a series of sequential pix are in order.

Stage 1: The ring mount and main weapons have been drilled out with a 1.5mm drill bit. A bit fiddly, but possible:


Stage 4: Not much different to see here from Stage 3 above. The earth magnets are simply glued into the bottom of each main weapon and the MG is in place. (A second MG is also permanently glued into place on the driver's side.)

Stage 5: Finally, the completed vehicle & "accessories" in all their glory below. (a) There is no way all the artillerists can be fitted into the truck bed and (b) it is too crowded for the MG mounted in the back + artillery dudes + main weapon. However, the point of tis effort is achieved. That is, presenting a variety of mix & match combos available to the Italian player, by now dizzy with possibilities, for his humble light truck:

Comments
Post a Comment