First Barrage
After quite a hiatus, I recently decided to update my previous posting from 2014 with 5 new photos of 15mm WWII items below.
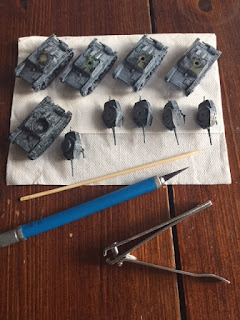
Following my assembly of several German SdKfz 222 armoured cars from Zvezda, several gaps appeared along the edging joins among two of the model cars. To fill these I used two-part Apoxie Sculpt putty from Aves, which I found surprisingly easy to work with and easy to carve away using an X-acto blade once the putty had been allowed to dry for 24 hours. Highly recommended for filling unwanted cracks and crevices.

Next I wanted some Chinese infantry for the China-Burma-India Theatre of Operations. Since I could find no figure manufacturer for these figures, I thought my best bet would be to swap (1) American GI heads onto (2) the torsos of British 8th Army troops, both being produced by Old Glory [Command Decision]. Using an X-acto blade to decapitate the heads, I then used a hand drill to drill small holes into the torsos and heads. (Yes, drilling out 1mm diameter holes into 15mm=scale heads is tedious.) One end of a short, flexible, plastic rod 1mm in diameter obtained from a model railroad shop was glued using quick-drying [5-minute] two-part epoxy and inserted into the torso. Once set, the head was later fitted onto the rod sticking above the torso and the rod cut down to the proper height before gluing it in place. After the glue dried some figures had some excess metal carefully carved away and/or received extra amounts of glue as applicable.

The photo below shows a Desert Rat Bren gunner with a narrow [railroad hobby shop] rod inserted into the hole within the torso before being cut down. The head would later be attached.

Finally we have some Late War Commonwealth infantry, again from Old Glory [Command Decision]. After a black spray, I almost always apply a reasonably faint white drybrush before applying a base coat colour to the figures, Vallejo's 'English Uniform' in this case.

After the base coat, I quickly coated the figures with Citadel Shade's 'Serphim Sepia'...basically the "brownest" brown ink I could find. I believe this produces a nice effect to bring out a measure of shading and "depth" to the figure without being too shiny. This is really the first time I got away with using ink like this to my painted figures. I hope to continue a new trend with this ink.
Important Note: Do Not use Flames Of War's 'Rommel Shade' on the cheaper acrylic paints that you have mixed together. (For example, white + black for producing some shade of grey.) I found that Rommel Shade will make the blended acrylic paints run or wash out to the point that you need to repaint the figure all over again.

Figures and vehicles and coffee; oh my! Congratulations on your new site!
ReplyDelete"I can't come back; I don't know how it works! --The Wizard of Oz